Administration
IP Forwarding
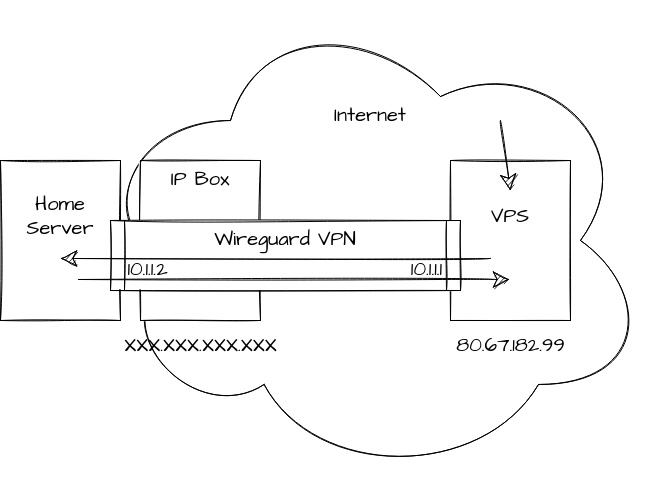
sagou.in is self hosted behind an internet provider router, meaning that it does not have a public IPv4. To remedy this, Rhizome, a Compiègne association that provides internet services, is providing us a public IPv4 and a VPN connection to their servers to act as a storefront that forwards every request to the self hosted server via a VPN. Associated configurations and scripts are versioned on gitea.
Overview
A wireguard VPN is setup between the home server and VPS. Requests on specific ports of the VPS are routed to the home server through the VPN and back. Request originating from the home server also pass through the VPS to avoid leaking its real IP. A keepalive parameter is used to make sure that the home server initiates the VPN because the VPS cannot.
Configuration
To route all traffic in the VPN in the home server side, the default route is simply replaced from the actual network interface to the wireguard interface. The wireguard configuration allows this with the AllowedIPs field.
[Interface]
Address = 80.67.182.35/27
PrivateKey = ...
DNS = 80.67.169.12,80.67.169.40 # FDN DNS

PostUp = ip route add default via 80.67.182.33 metric 50
PostUp = ip route add 80.67.182.71 via 192.168.1.1 dev eth0
PreDown = ip route delete default via 80.67.182.33 metric 50
PreDown = ip route delete 80.67.182.71 via 192.168.1.1 dev eth0

[Peer]
PublicKey = ...
AllowedIPs = 0.0.0.0/0
EndPoint = 80.67.182.71:1194 # vpn.rhizome-fai.net
PersistentKeepAlive = 25
These configurations are started with wg-tools upon start with a dedicated service
systemctl enable wgvps.service
[Unit]
Description=WireGuard tunnel to Rhizome VPS
After=network-online.target nss-lookup.target
Wants=network-online.target nss-lookup.target
PartOf=wg-quick.target

[Service]
Type=oneshot
Restart=on-failure
RemainAfterExit=yes
ExecStart=/usr/bin/wg-quick up wgvps
ExecStop=/usr/bin/wg-quick down wgvps
ExecReload=/bin/bash -c 'exec /usr/bin/wg syncconf wgvps <(exec /usr/bin/wg-quick strip wgvps)'
Environment=WG_ENDPOINT_RESOLUTION_RETRIES=infinity

[Install]
WantedBy=multi-user.target
Fan Control
The NAS case for the Pine64 Rock Pro comes with a fan to cool the closed box. It is to be plugged in the FAN port of the board, as indicated on the Wiki Page.
By default, it will turn at full speed, but can be PWM-controlled, in particular with the software found on Github - ATS.
Install
The installation instructions are dead-simple:
git clone https://github.com/tuxd3v/ats
make
sudo make install
As explained on the repository, the fan has the following control:
- Below 40°: normal operation, no fan
- Between 40 and 60°, progressively increase the RPM
- Above 60°: abnormal heat, full blow
Configuration
The default configuration is annoying (periodically loud) so the following variables were changed in the /etc/ats.conf file:
| Variable | Value |
|---|---|
| MIN_CONTINUOUS_THERMAL_TEMP | 45 |
| ALWAYS_ON | true |
| MIN_PWM | 20 |
| PROFILE_NR | 2 |
Swap
Swapiness
By default, Swapiness is set to 100. It means that swap will be used as much as ram. To avoid it we will set swapiness to 10.
# see swapiness value
sysctl wm.swapiness

# change swapiness value
sysctl -w wm.swapiness=10
To make change persistant, create the file /etc/sysctl.d/99-swapiness.conf with
wm.swapiness=10
ZRAM
Armbian comes with a feature called ZRAM, which is basically a portion of RAM dedicated to holding temporary data in a compressed form. This is to prevent small but frequent writes (such as logs) from deteriorating an SD-card or eMMC module too quickly. In our configuration (the default one), /var/log is mounted in this ZRAM partition and periodically (every few hours) writes the whole thing in the /var/log.hdd folder. This is thus normal if the partition always seems full and it should cause issues.
SSH
Yunohost handles most of the SSH configuration but some manual intervention is still needed to improve security:
Add users
By default, only admin can connect and we need to manually add other users (Tuto):
yunohost user ssh allow <USER>
Disable password authentication
Tuto:
PasswordAuthentication no
Match Address 192.168.0.0/16,10.0.0.0/8,172.16.0.0/12,169.254.0.0/16,fe80::/10,fd00::/8
        PermitRootLogin yes
        PasswordAuthentication yes
Change port
As the UpNP handles port forwarding, we cannot obfuscate the ssh port from the router. We need to change the server's configuration (Tuto):
sudo nano /etc/ssh/sshd_config
    port <PORT>
sudo yunohost firewall allow TCP <PORT>
sudo yunohost firewall disallow TCP 22
sudo nano /etc/fail2ban/jail.d/my_ssh_port.conf
    [sshd]
        port = <your_ssh_port>

    [sshd-ddos]
        port = <your_ssh_port>

sudo yunohost firewall reload
sudo systemctl restart ssh
sudo systemctl restart fail2ban
Backups
How
Autorestic
We chose autorestic over other backup tools (borg, restic, manual scripts) for its expressiveness.
It works with a yaml configuration file located in /etc/autorestic/, along with an environment file that stores repositories keys). That way sensitive information is kept separate from the configuration file, that can have broad access rights and be versioned.
Periodically, a cron job will parse the config and makes a backup if necessary. Commands are ran as root.
To setup backups:
mkdir -p /mnt/ssd/backup-working/db-dumps /mnt/ssd/backup-working/gitea
chmod 750 /mnt/ssd/backup-working /mnt/ssd/backup-working/db-dumps /mnt/ssd/backup-working/gitea
chown root:backup /mnt/ssd/backup-working
chown gitea:gitea /mnt/ssd/backup-working/gitea
chown root:backup /mnt/ssd/backup-working/db-dumps

sudo crontab -e
# and input
#PATH="/usr/local/bin:/usr/bin:/bin"
#00 * * * * /etc/autorestic/runcron
#30 3 1 * * /etc/autorestic/runforget
Be careful when first initializing a backend, autorestic will modify the config, removing comments and order. New keys and passwords will be added to the configuration so remember to put them in /etc/autorestic/.autorestic.env by referring to the docs.
Where
Local
For everyday backup and to protect against human mistakes, a local backup can be used. For this, follow this tutorial.
SFTP
For more important backups and to protect against hardware failure, without worrying too much about space or bandwidth, a distant backup is great. Restic and autorestic support sftp transfers out of the box. For this:
- On the remote, create the user that will be connected to (e.g:
autorestic-sagou.in) - On the remote, create the folder that will be used as storage (e.g:
/var/backup-sagou.in) - Set-up password-less login for that user
- Optionally, add an entry to the .ssh config if the ssh port is not 22
- Follow this tutorial
Scaleway's Object Storage
Finally, for long term and rarer backups, object storage (or S3) is used. Here, the chosen provider is Scaleway but AWS or OVH could have been alternatives. In addition, Scaleway provides a really cheap Glacier tier meant for long-term and slow-changing data.
Because the S3 interface of restic is not fully compatible with scaleway, we use rclone:
- Configure rclone following this tutorial
- Create a bucket in scaleway interface (e.g: autorestic-sagou.in)
-
Configure the bucket to store away in the cold storage after n days (e.g: create a rule "Put-2-Glacier" with prefix "data/" and moving to glacier after 7 days)
What
Gitea
Gitea provides a tool for export/import that is run as a pre-hook when backuping gitea:
sudo -u gitea /opt/gitea/gitea dump
Storage
The server currently hosts three storage mediums:
- A 32GB eMMC (sort of more robust SD card) for the OS, configuration files and small applications
- A 1TB SSD for most applications (
/var/www,yunohost.app) and home directories - A 4TB HDD for multimedia and backups
Partitioning
All drives only contain one partition, formatted in ext4.
LVM was considered but added unnecessary complexity and made it harder to use the drives outside of the server without prior manipulations.
Nextcloud Customization
Empty Skeleton
By default, nextcloud adds lots of useless clutter. To remove it:
sudo -u nextcloud php --define apc.enable_cli=1 /var/www/nextcloud/occ config:system:set skeletondirectory --value=''
Garage
A garage server is used for backups.
Summary
The idea of garage is to distribute data within nodes of a cluster and expose an S3 API to populate it.
Our node, marsouin (a secondary computer made up of old hard drives) is connected to the Rhizome's cluster, comprised of 6 nodes totalling a few TB at the time of writting.
Routing
Garage requires a public IP adress on port 3901 by default, but marsouin does not own one.
Instead, the port is forwarded from sagouin which has one, to marsouin thanks to the following iptable rules on sagouin:
iptables -A PREROUTING -t nat -p tcp -d <PUBLIC_IP> --dport <PORT> -j DNAT --to-destination <PRIVATE_IP_MARSOUIN>:<PORT>
iptables -A OUTPUT -t nat -p tcp -d <PUBLIC_IP> --dport <PORT> -j DNAT --to-destination <PRIVATE_IP_MARSOUIN>:<PORT>
iptables -A POSTROUTING -t nat -p tcp --dport <PORT> -j SNAT --to-source=<PRIVATE_IP_SAGOUIN>
iptables -t nat -A POSTROUTING -j MASQUERADE
sysctl net.ipv4.ip_forward=1
Basically what they do is preroute incomming packets towards marsouin and masquerade its response (the postroute) as if it came from sagouin. In addition, the output is for cases where sagou.in itself wants to talk to marsouin. Notice how the PREROUTING and OUTPUT lines are the same after the table name.
The iptables rules are made persistent by putting them in a Yunohost specific bash script that is executed at startup, named
/etc/yunohost/hooks.d/post_iptable_rules/99-specific_rules
Marsouin storage
marsouin is another computer located in the same private network as sagouin whose sole utility is to store old, semi-broken hard drives.
As such it will be slow and prone to hardware failures.
To limit the impact of these issues, garage will be distributed accross all hard drives. To prevent catastrophic failure if one dies, an additionnal SSD stores the OS and garage's metadata.
Old BTRFS way
DO NOT USE, prefer the above method and only keep this section as reference of what used to be done.
BTRFS is used to setup a software RAID :
sudo mkfs.btrfs -d raid1c3 -m raid1c3 /dev/sd{a,b,d,e,f}
sudo mount /dev/sda /mnt
meaning that a RAID1 with 3 duplications is distributed across 5 hard drives of varying capacities, both for data and metadata storage. As such, 1 to 2 hard drives can fail without much of an impact outside.
The state of the RAID can be checked with
btrfs filesystem usage /mnt
Garage setup
After installing garage and starting it with a
garage server
with the following configuration
metadata_dir = "/mnt/ssd/garage/meta"
data_dir = "/mnt/ssd/garage/data"
db_engine = "lmdb"

replication_mode = "3"

rpc_bind_addr = "0.0.0.0:<RPC_PORT>"
rpc_public_addr = "<PUBLIC_IP>:<RPC_PORT>"
rpc_secret = "<SECRET>"
bootstrap_peers = [
    "<ANOTHER_NODE_ID>"
]

[s3_api]
s3_region = "garage"
api_bind_addr = "0.0.0.0:3900"
with ANOTHER_NODE_ID that come from another node doing garage node id and automatically makes the wole cluster available to us.
The connection can be verified with
garage status
Our node then needs to be described to others with
garage layout assign OUR_NODE_ID -z ZONE -t TAG -c CAPACITY
garage layout show # To check that everything is right
garage layout apply --version XXX
with ZONE being vaguely a geographical zone to favor distributing accross zones, TAG a simple tag for the user and CAPACITY being a vague description of how much space is available.
Our current rule of thumb for the capacity is the number of GB in the node, but it could be any integer.
The --version flag in the apply command is simply incremented every time the cluster layout is modified.
S3 Bucket
In order to expose the storage as S3, the following have been done on marsouin:
- Create a new bucket
garage bucket create BUCKETNAME
garage bucket set-quotas BUCKETNAME --max-size 200GiB
- Create a new key to access the bucket
garage key new --name KEYNAME
garage bucket allow --read --write --owner BUCKETNAME --key KEYNAME